xum1541 firmware for the ZoomFloppy
The xum1541 is firmware for USB device(s), such as the
ZoomFloppy,
which connect Commodore 15x1 or PET floppy drives to your PC.
It is based on the Atmel AT90USB family of microcontrollers
and is provided under the GPL license. It was developed by
Nate Lawson, with testing and assistance from Wolfgang Moser,
Spiro Trikaliotis, and Christian Vogelgsang. It uses code from the
xu1541
by Till Harbaum and the
LUFA
USB library by Dean Camera.
A commercial version called the
ZoomFloppy is now available from Jim Brain.
It is quite nice and only slightly
more expensive than a bare Atmel developer board, so I no longer recommend
building your own hardware.
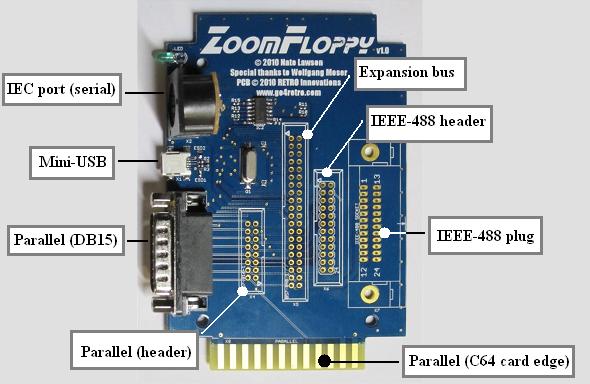
The ZoomFloppy has connectors for IEC serial, parallel, IEEE-488,
and 40-pin expansion connector.
The latter has all signals from the microcontroller, so you can debug
or build new devices from it as well.
Manual and installation package
2011/9/25: v2.0 released
Support
If you're having problems with the initial setup or have questions
about the ZoomFloppy product, please contact the
ZoomFloppy users mailing list.
If you're having problems with using the software after installation
succeeded, please see the
OpenCBM-users mailing list.
Releases
- 0.7 (2011/9) - IEEE-488 support, 1571 serial nibbling support,
firmware update tool, bugfixes to reset routine and cbmcopy.
- 0.6b (2010/10) - Numerous bugfixes and optimization/stabilization of
routines.
- 0.6 (2010/7/5) - New protocol (version 6) with reduced latency and
support for indefinite waiting, better reset when the previous command
is aborted with ^C, new ZoomFloppy board design, updated to LUFA 091223
- 0.4 (2010/1/4) - Bugfixes for reset handling, both for IEC and USB.
Protocol version 2.
- 0.3 (2009/12/23) - Add nibbler (mnib/nibtools) support and misc
stability fixes. Protocol version 1.
- 0.2 (2009/12/11) - Initial beta release for AT90USBKEY board.
Protocol version 0.
Developer docs
The ZoomFloppy is a simpler version of the original design, intended for
low-cost manufacturing with high-speed performance. It is now available
commercially, which should make it the best choice for nearly all users.
It is very inexpensive, costing only slightly more than the Atmel USBKEY
board, so in almost all cases, you don't need to build it yourself.
If you do want to build it yourself, it can also be based on the Bumble-B
daughterboard. However, the easiest option for DIY is the USBKEY board
(below) since that only requires soldering a single connector (DB25) to
the development board.
This device uses an ATmega32U2 microcontroller (AT90USB162 if you use the
original Bumble-B). It has a 7406N hex inverter for better control of the
pins. It runs at 5V with the board supplying power for the inverter.
For build info, see the included schematic,
zoomfloppy-schem-*.png.
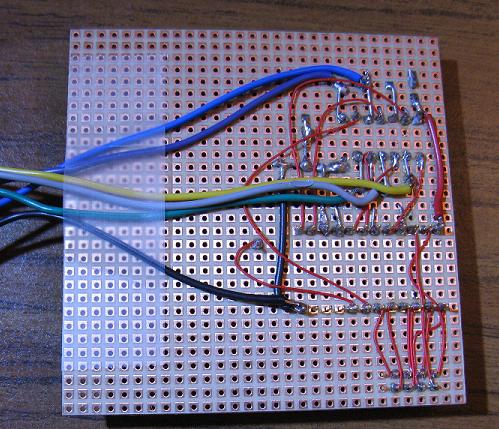
This is a perfboard build of the ZoomFloppy design. It has the parallel
connector on a header with a custom cable to connect to the D-SUB 15 pin
plug.

Here's a pic of the original breadboard version of the ZoomFloppy. The 7406 is
on the left of the Bumble-B cpu board. The IEC serial port is on the far
left. The parallel connections for the 1541 go off the bottom.

xum1541 AT90USBKEY board
This is the first generation board and is based on the Atmel AT90USBKEY
developer's kit. The firmware was designed to be modular so there will
be other boards some day.
See the xum1541 README
for pinouts and build info.
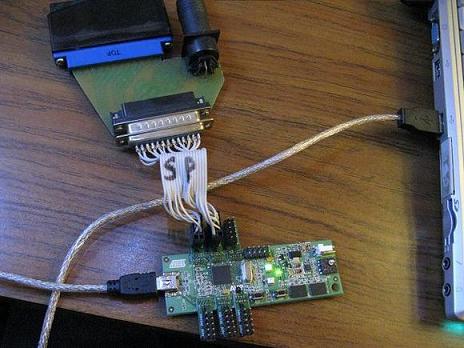
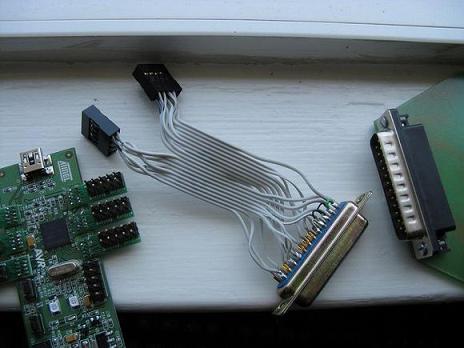
Here are some pics of the xum1541-AT90USBKEY model. As you can see, the
devel board is connected directly to an XAP1541 adapter via a DB25 port.
The "S" and "P" mean IEC serial and parallel connections.
